Welcome

I'm so glad you decided to join me on my blog. I'll offer product tips, techniques and information. You'll also see the more personal side of our business. I hope you'll enjoy following us on this new journey. Carol

Monday, June 24, 2013

Minnesota Quilters Quilt Show

If you saw my last Blog Post you know that we had a LOT of unpacking to do. We did manage to get everything in our booth. Here's a picture of the booth all set up.


At one point I had to take a break from the chaos of set up so I took a power walk through the quilts on display in the aisles right near our booth. Unfortunately that is all I was able to see of the quilts during the show but there were some gorgeous quilts on display. There were some that I have seen several times. This one really caught my eye though.

Look at all of the Half Square Triangles and points.
When you see the next photo you'll be even more impressed with this piece.

I'm not touching it
Don't worry. I'm not touching the quilt. I had to put my hand by the quilt so you could get a feel for how small it is. Turns out it won First Place in the Miniature Category. Those are a lot of triangles and points in a full size quilt. I can't imagine doing it on such a small scale! Very impressive!

Just had to share with you.

Happy Quilting,
Carol


Wednesday, June 19, 2013

Japanese Embroidery

I had the pleasure of spending some time with Kathryn Elms of Azumi Japanese Embroidery Studio from Roswell, NM when we were at the Albuquerque Fiber Arts Fiesta. The first time I was in her booth I was amazed at the framed pieces I saw. I spoke with her husband about it and he walked me through piece by piece and explained the different levels.

The next morning before the show opened I took Alan by to see what I was so excited about. This time Kathryn was free and explained some more about the process. She had a Power Point presentation that showed the history of Japanese Embroidery and the process.

She studied at the Japanese Embroidery Center in Atlanta, GA. This is the main source of education everywhere in the world, except Japan. It was founded in 1989. There are ten levels of instruction and one needs to complete all ten and pass their final in order to teach Japanese Embroidery. 

There is a lot more to it than what we think of when we think of embroidery. Think of the most beautiful kimono you have ever seen and the embroidery on it. This is the kind of embroidery I'm referring to.We are used to grabbing some fabric, needles and either perle cotton, floss or silk ribbon and that’s it. These are the tools that are used in Japanese Embroidery.

Tools for Japanese Embroidery
The fabric used is silk as is the thread. The designs are hand drawn onto the fabric at the Japanese Embroidery Center or JEC. Along with each design you get what is called a cartoon and a color version. The cartoon is where you document your stitches, threads, etc. That way if you want to reproduce it or in Kathryn’s case teach it, she has a record of what she did. These are very intricate designs. This is the design that she was working on in her booth.

The design Kathryn was working on. You can also see the thread she uses
 The embroidery is all done in a frame, similar to a quilting frame. The fabric is pulled drum tight and the first session of the five day Phase 1 class focuses on the mechanics such as how to get the piece in the frame properly and how the tools are used.

Kathryn Elms at work. She is using her left hand to help manipulate the thread. You don't just pull it through the fabric the way you would for a RedWork design.
The thread is silk and has 12 threads in a strand. There are techniques such as couching where a single strand is used. This is doubled and then is hand twisted. I played with some of Kathryn’s thread scraps. It is so soft and smooth. Just touching the thread is a very zen-like experience.  

This is the Phase 1 project. It consists of five days of classes, studying for 6 hours a day. That gives you the basics but just like in quilting and stitching classes, you learn the technique. Most of the time we don’t complete the project in class and that is definitely the case here.

Phase 1 Class Project

There are over 40 different Japanese Embroidery stitches to learn. Each phase of instruction adds more stitches and techniques. When you get to Phase 10, you go to the Japanese Embroidery Center to work on this project. It is a week of instruction. This is your “final.” They make sure that you have mastered every one of the stitches. When you have completed this and passed, you can then become an instructor. This is Kathryn’s Phase 10 piece.

Phase 10 Project


Here is a close up of the same piece.


I am absolutely fascinated with this. There was something very peaceful about the process. Meditation is actually incorporated into the instruction. One of the things that Kathryn told me is that her master teacher told her over and over again when she was learning that you need to forgive yourself. I felt so encouraged by this. The philosophy is that your work is your history. You learn from each phase and each project. So forgive yourself if you aren't perfect. Learn from the experience and you’ll do better as you progress. This is the way I teach too and I think for most people it makes the learning process more fun.

When I am off the road, I would definitely like to explore this fiber art medium. If you'd like to know more about Kathryn visit her website at http://www.azumijapaneseembroidery.com/. If you’d like to learn more about Japanese Embroidery and the Japanese Embroidery Center here is their website http://www.japaneseembroidery.com/nuido/index.html . You can watch a video that explains a little bit about it on their website. I have just barely scratched the surface.

Happy Stitching,

Carol

Sunday, June 16, 2013

Interesting Sights

We saw many interesting sights on our trip from Southern CA to Minnesota. One of them was the Great Platte River Road Archway in Kearney, NE. I saw signs for the arch and had no idea what to expect. Usually the freeway signs mean that you get off the highway at an exit and drive to whatever the landmark is. So I was pleasantly surprised when it turned out that it spanned the highway.

Great Platte River Road Archway


The Great Platte River Road Archway was completed in August of 1999. It is a tribute to the pioneers who crossed the country in covered wagons, on horseback, by stagecoach and train. It is an interactive museum that takes you back in time to the mid 1800s. Unfortunately we were in too big a hurry to get to our next stop so we didn't stop to experience it other than to drive under it. If we have a chance I'd like to stop and go inside another time. You can read more about it on their website http://www.archway.org/About/default.aspx .

Here are a pictures of the graphics on the sides of the bridge.

The left side of the Arch
This is what the other side looks like up close.


This is just one of the interesting things we have seen on this trip.

Here's to exploring new sights.

Carol


Monday, June 10, 2013

Heading to the Midwest

We left on Saturday for the Minnesota Quilters Quilt Show and Conference. This is our first of three shows in the Midwest. One of the biggest challenges in getting ready for the trip was getting the truck packed for these shows. We had to order extra product since some of our vendors don't drop ship.

Fortunately my husband, Alan, is really good at packing. We were recently at a show and when another vendor drove by our packed truck he asked if we still had room for a can of sardines. This trip we have even more in the truck.

This is what the back part of the truck looked like the day before we left.


Those two orange straps are what holds our hand truck on the back of the truck. There might be a tiny bit of room above our poles on the right side but if there is it isn't much.


You can see our two DMC thread chests.They sit on top of the boards that give us some elevation in the back of the booth. Underneath that is all of our grid wall. Anything that is skinny enough to fit gets stuck in the little "dead space" created by the wheel well.


Crates are stacked on top of each other and small boxes that hold patterns are piled on top of them. You can see our tables and the racks that sit on the tables with our tea towel models on them.

Tuesday is set up day for the show. We will unload everything and get all of this in our 10' x 20' booth. I did a Blog Post about that process awhile back. That was before we added Bird Brain Designs and all the RedWork Accessories. But you'll get an idea of what is ahead of us tomorrow.

Happy Quilting and Stitching,
Carol


Saturday, June 1, 2013

The Best of the Valley Doll Exhibit

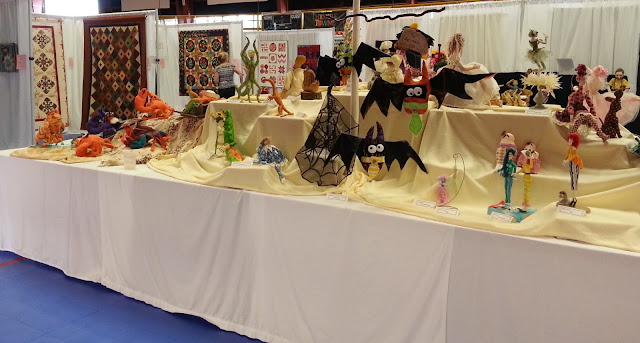
I thought I'd do something a little different for this post. The Best of the Valley Quilt Show in Lindsay, CA had the biggest doll exhibit I've ever seen at a quilt show. They had a huge variety. There was everything from elaborately dressed women, to stuffed animals and mythological creatures.

I would like to share some of them with you. I know that the pictures extend a little past the usual display area but they really need to be big so you can see the detail.


"Where the Wild Things Are" is one of my favorite children's books. I love the display with the book and the little boy from the story. The collection of pincushions is very cute too.


My favorites in this photo are the the Japanese dolls with the fan behind them. Each one is holding a fan in front of her face. I also love the texture and detail in the doll that is bent into a circle. I love the tree bark texture and the unusual shape.


Aren't these bats fun? They make me smile. They are so goofy looking.


The detail on the brown and teal doll in the center is amazing. She is just gorgeous. On the opposite extreme you have the cute crabs and lobsters in the foreground.


Look at the whimsical creature on the bike. The spokes are tiny beads. This doll was made by Susan Bellamy. She was the featured doll maker at the show. I plan to do a blog post in the near future on her exhibit. You won't believe the rest of her work.

I wish I could have taken detailed photos of every single doll on display. The workmanship of all of these pieces was exemplary. It was a very inspiring display.

Carol