Welcome

I'm so glad you decided to join me on my blog. I'll offer product tips, techniques and information. You'll also see the more personal side of our business. I hope you'll enjoy following us on this new journey. Carol

Sunday, March 16, 2014

Another Stitching Turned Applique Project

I've been changing up the Harvest Tea Towels pattern. Since I like to do different things, I decided that instead of stitching the designs on tea towels, I'm going to make it into a small wall hanging. I have one block left to finish stitching before I get to that project.


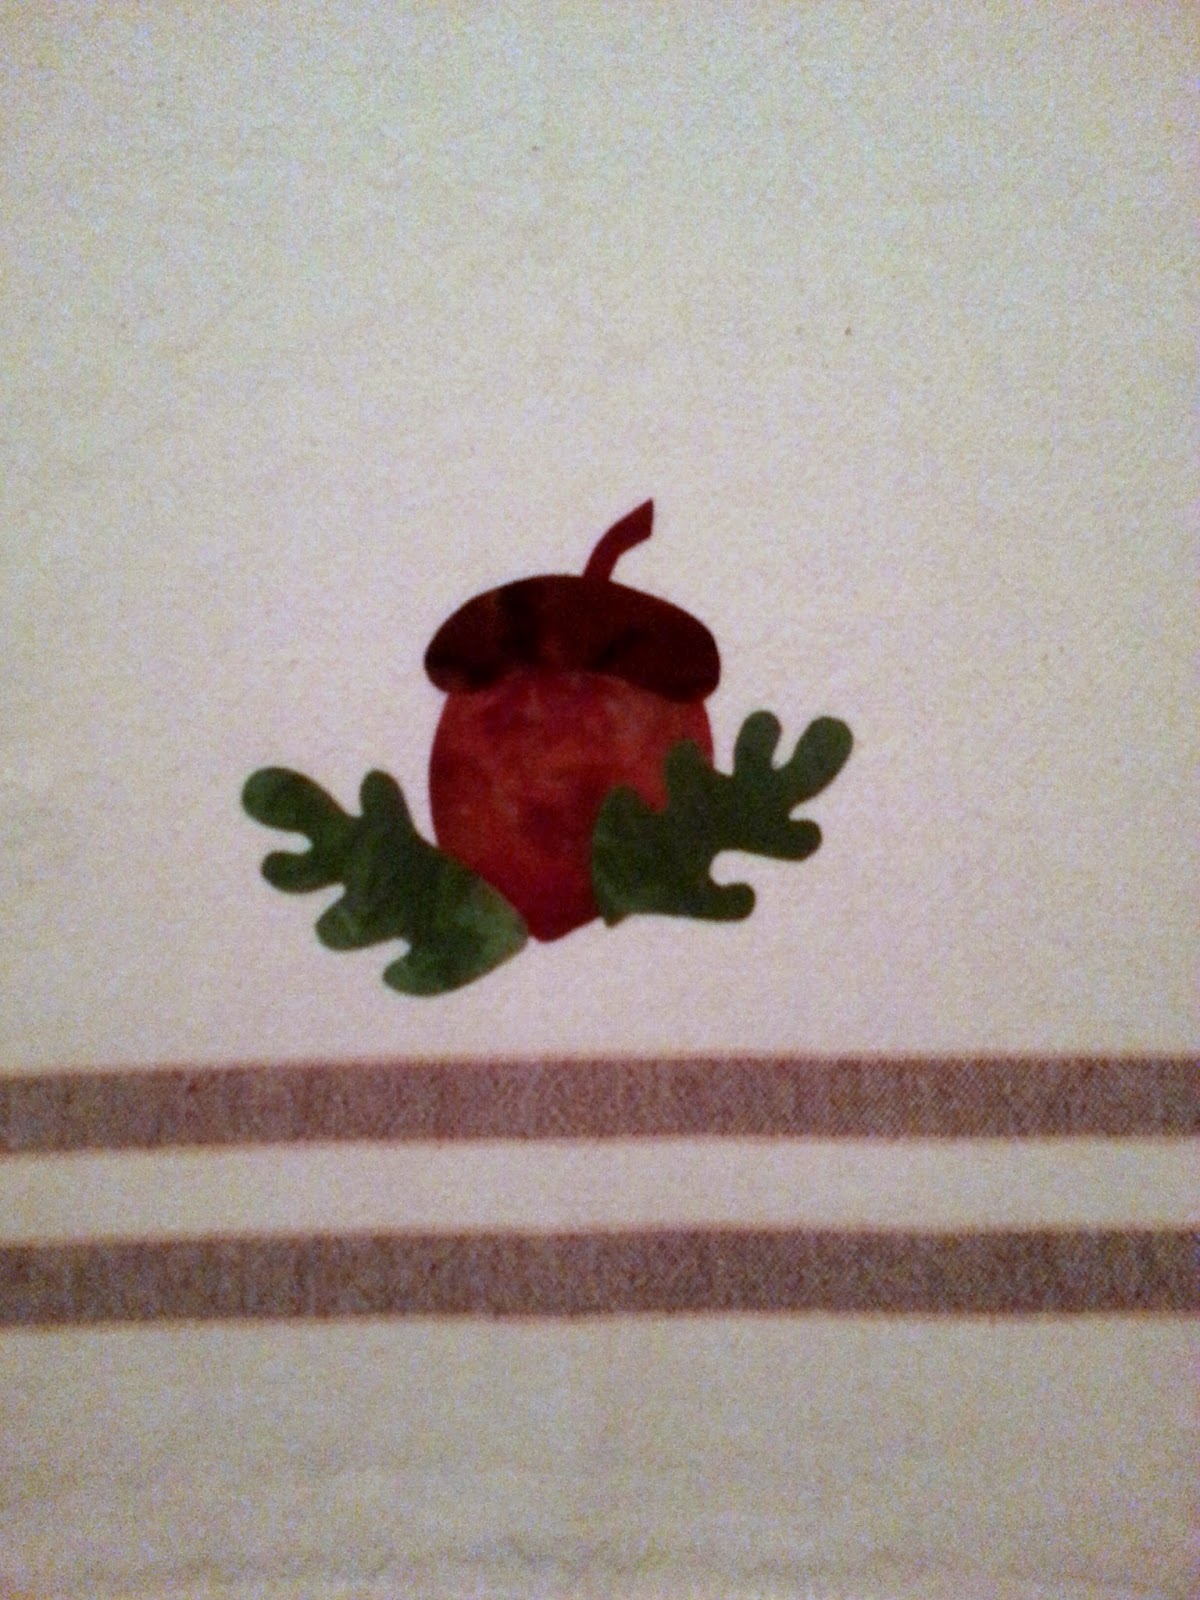
I recently finished the acorn block. While I was working on it I thought that it would make a nice applique block. 


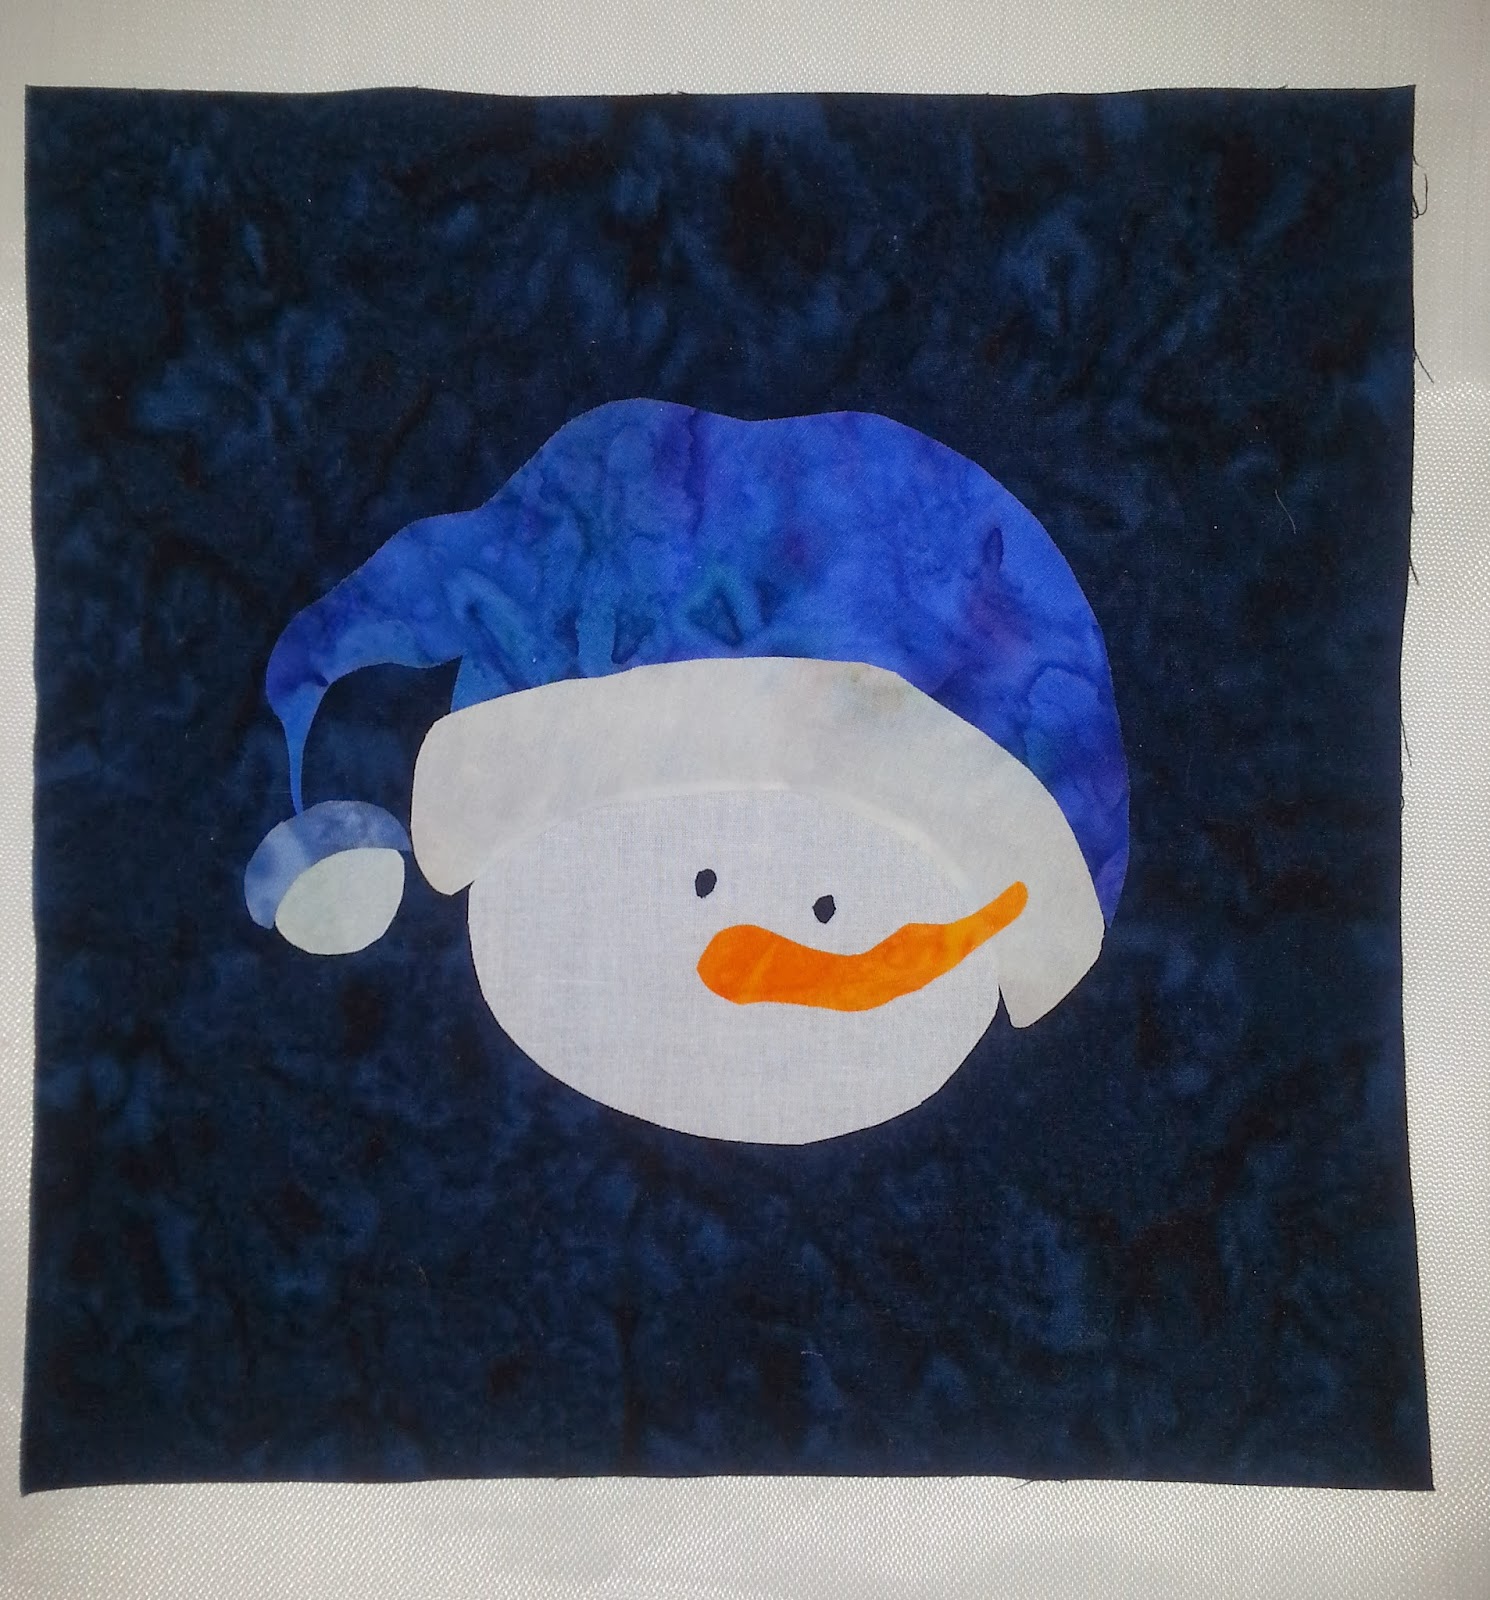
I played around with this concept in another Blog Post with the Snowman from the Winter Partners Pillows Pattern.


I decided to use a Brown Striped Tea Towel. I found these pretty fall batiks and hand dyes to work with. I like them for fusible applique because they have a high thread count. A tea towel will be washed so I wanted fabrics that aren't likely to fray much.


I traced the REVERSE image of the design onto fusible web. Since the fusible goes on the wrong side of the fabric, if you don't reverse the design when you fuse it onto the background fabric (tea towel in this case) the image will be the mirror image of the drawing. This time I added a little extra to the pieces that will go underneath others, like the basic acorn shape and the stem. When I did the snowman I didn't do this and it made it a little harder to put the pieces in place. I decided not to add the bird. I kind of have a problem with the scale. Either the bird is super tiny or the acorn is HUGE. I roughly cut around the pieces and fused them to the wrong side of my fabrics.


I cut out each individual piece. I used an Applique Pressing Sheet (See previous Blog Post) to make the fusing process much easier.


I put each piece in place on top of the Pressing Sheet using the pattern as my guide. Once I had it exactly how I wanted it I fused the entire design onto the Pressing Sheet. 


Now the whole thing is one piece which makes it so much easier to put onto the towel. I just peeled it off and placed it where I wanted it on the brown tea towel. Then I fused the design onto the towel. 


I put a tear away stabilizer behind the design. You could also use a wash away such as Sticky Fabri-Solvy. Since the towel will be washed the Sticky Fabri-Solvy will dissolve in the washer. You want the stabilier behind so that when you stitch around the design it doesn't pucker.


Most of the time I use a short blanket stitch on  my machine to stitch around the fused pieces. I have also used a satin stitch and a free motion zig zag. In this case all I wanted to do was stitch it in place. I wasn't worried about adding texture to the design so the blanket stitch worked just fine. This is the setting I used.


This was a fast and easy project. It took me about an hour from the time I decided to do it until I was done stitching around the design. It will be a nice addition to my home this fall. It would also make a nice gift.


Happy Quilting,

Carol


Tuesday, March 11, 2014

Memorial Quilt

Generally speaking. people think of a memorial quilt as one with signatures or photos as the foundation for it. I made this quilt top a couple years ago as a sample for my booth at Quilt Shows.


The quilt is a Courthouse Steps variation of a Log Cabin Block. It is a From Marti Michell pattern called Stepping Stones. As usual my quilt doesn't look like the pattern picture.


I had some quality quilting time blocked out and decided to finally quilt it. The evening before I basted and started quilting it, I learned that my 24 year old nephew had died suddenly. 

I basted the quilt and started quilting it. After I'd done all of the stitch in the ditch quilting and the first set of logs I realized that while it is a little on the small side, it was the perfect quilt for my brother and his family. Here's why. The hand dyed fabric is from a collection called Rainbow Zen. Every time I look at the quilt I feel a sense of calm. Stepping Stones seemed like an appropriate design since it kind of symbolizes the steps to healing from such a tragedy.

Once I came to that conclusion, the ideas for quilting it just flowed. I had planned to do different free motion designs in the logs and those ideas came easily. I did a swirl design to start with. When I knew it was going to be a memorial quilt, leaves seemed appropriate to represent life. There are 12 blocks so I chose 12 words that I thought were important to my brother's family and that represented things that will help them through this difficult time and quilted one in the center of each block. I quilted circles in the outside border to symbolize eternity. Here is a picture of the quilting.

"Courage" is quilted into the center of this block
I definitely wanted a special label. I chose pictures from Facebook and a memorial website set up for my nephew because I knew that they had special meaning for the family. I made a collage of those in Word and then added the title of the quilt, "The Path to Healing," and other information I wanted on the label. I printed it on paper to be sure I had good margins around all four sides then I printed it on Printed Treasures Photo Fabric.


There are several treated fabrics on the market. I have had good success with this one and I had some sheets leftover from another project I made a couple years ago. This is the label for the quilt.


There was so much more that I wanted to say about the quilt. I wanted them to know why I chose to give it to them. Why I quilted it the way I did and the symbolism I saw in the fabrics, pattern and quilting. I thought about writing it on paper and putting it in a card but I wanted it to be something that stayed with the quilt so they could look at it over and over again. Then I thought of writing it on paper and putting it in a pocket on the back of the quilt. I was afraid that at some point in time the quilt might need to be washed and if the note was in the pocket it might go through the wash and I didn't want them to have to worry about that. Then I thought about printing it on another sheet of photo fabric. What I finally decided to do is to write it on fabric. A handwritten note seemed so much more personal than a typed note. I used a Micron Pigma Pen because it has a fine point and because the ink is permanent. It is usually my choice for quilt labels. I wrote the message on muslin and used a pinking blade in my rotary cutter to finish the edges. That way I didn't have to turn them under.

Here's a picture of the back of the quilt. There's some pink in the quilt so if my brother and nephew aren't too crazy about that side, the back is nice too. The quilting shows up well so it will have the same symbolism, just on a neutral fabric. I chose some of the fabrics from the blocks to bind the quilt. 


And here's a picture of the front all finished.


This truly was a labor of love. Many a tear was shed during the process and even more when I got the comments from my brother and sister-in-law the day it arrived. They love it and are touched by the love and thought that was put into it. They feel the sense of comfort that I intended.

This quilt is serving the same purpose that a more traditional memory quilt full of pictures and signatures does, but only a little bit of that is incorporated in it. I hope that this will inspire others to realize that any quilt can be a memorial or special occasion quilt.

Happy Quilting,
Carol


Sunday, March 2, 2014

Snowman - From RedWork to Applique

I love to think outside the box. Most of my quilts are done in color combinations other than what the designer used. I tend to take liberties with a design. One thing I've been contemplating for awhile but haven't had time to experiment with is taking a Redwork design and turning it into an applique design.

The project I chose to experiment with is the snowman from the Bird Brain Designs pattern Winter Partners.


I chose this one because the design is large and seemed like an easy one to adapt to applique. Here is the drawing of the snowman.


Remember if you want to do something like this and you want it to look like the original design you need to REVERSE the image. In other words trace from the wrong side of the drawing, Here's the pattern taped to my studio window (on a rainy Southern CA day) so I can trace on the wrong side.


I traced the images onto fusible web.


I then fused them to the wrong side of my snowman fabrics.

One of my "Must Haves" is an Applique Pressing Sheet. 


Here is the snowman drawing with the pressing sheet over the top of it. I know it is a little hard to see but if you look closely you'll see the snowman design. I use the Lightbox App on my phone but needed my phone to take the picture. So when I'm working with it, the lines will show up better. 


I'm going to fuse the entire design onto the pressing sheet. It will be one solid piece that I will then transfer onto the background fabric. Here's the snowman transformed into fabric.


I chose a dark navy blue as my background. I finger pressed it in both directions to find the center of the fabric.


Then I found the center of the snowman design. I positioned it onto the background matching both centers (the snowman and the background). Then I fused the snowman in place.


He's a little crooked.  Guess I didn't get find the exact center of the snowman. It's such a whimsical design that it just adds a little more whimsy. At least that's my story and I'm sticking to it - lol.

I realized after I got everything fused down that I should have traced the eyebrows and smile when I had the fabric on the pressing sheet. I placed the pattern on top of the design and used my Point Turner to trace an indentation onto the fabric. Then I followed that with a Black Micron Pigma Pen.

I squared up the block and now it is time to add the borders. Check back soon to see how I finish it. 

Happy Stitching and Quilting,
Carol